Recently, I needed to get an instance of MySQL up and running quickly to play around with different methods of loading a large CSV file (1.6 million rows) into a database.
I wasn’t going to install MySQL locally so I decided to go with a MySQL Docker image and use that to trial different loading methods.
In this post, I walk you through:
- How I got MySQL up and running in Docker.
- How to access MySQL Docker container via DBeaver
- How I eventually loaded in the CSV file.
How I got MySQL up and running in Docker
First things first a quick look at my project’s structure which you can also find on git here. You will find the Dockerfile I used to get MySQL up and running in Docker.
FROM mysql
COPY ./data/*.csv ./var/lib/mysql-files/
ENV MYSQL_ROOT_PASSWORD=my-secret-pw
ADD ./scripts/create-schema.sql /docker-entrypoint-initdb.d
EXPOSE 3306
Basically what this file does is:
- FROM – Pulls the latest docker image of MySQL to serve as our base image.
- COPY – Copies the contents of the data folder containing the CSV files (raw data) we want to load to /var/lib/mysql-files/ (directory is intended to be used for load data operations)
- ENV – Set the default password for the instance.
- ADD – Add the create-schema.sql (which creates my database and schema) file to the bootup scripts for MySQL so that database gets created at run time.
- EXPOSE – Yes you guessed it, exposes port 3306 for use.
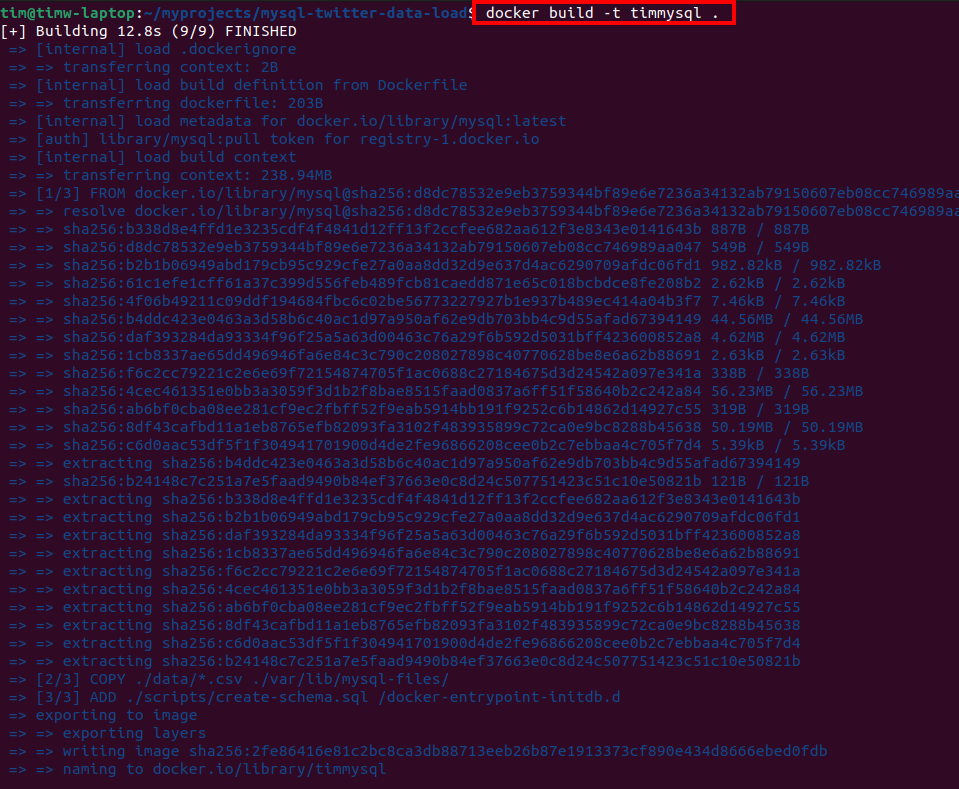
Building this image is pretty straightforward forward once the Dockerfile is set up you run the following command: docker build -t timmysql . (Don't forget the dot at the end!)
The -t just tags the image with a friendly name in this case timmysql
Running the command you will see the image getting built and the files being copied to the image.
Once the image is created a simple docker image ls will show you our newly minted mysql docker image.

Now you can start up your Docker container and have some fun. To do that you run this command: docker run --detach --name=timmysql --publish 3306:3306 timmysql
Note: --detach runs Docker in detached mode which means it runs in the background of your terminal. It does not receive input or display output.

A quick docker ps will confirm our Docker container is up and running.

- At this stage, we have a docker container running – check
- The container has MySQL installed – check
- My database with tables and schema created – check
How to access MySQL Docker container via DBeaver
Can we pause here for a minute and appreciate what a cool name DBeaver is? 😀 Seriously, thank you to whoever came up with that! Moving on.
Obviously, you’re going to have to download and install DBeaver and for that, I send you over to the good folks at DBeaver and their help documentation.
Once installed fire up DBeaver and connect to the instance:
- Server:
localhost - Port:
3306 - Username:
root - Password:
my-secret-pw
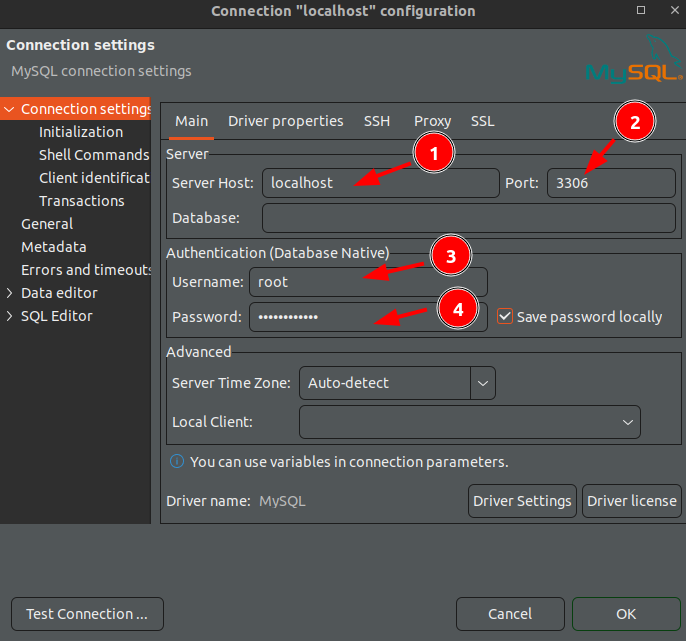
If using DBeaver you may have to apply additional driver properties useSSL = false and allowPublicKeyRetrieval = true
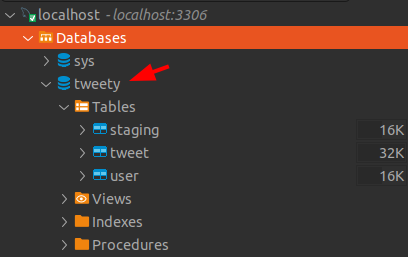
AND Voilà! you are connected to your MySQL instance inside a Docker container. You will notice the database has been created for you thanks to our Dockerfile running the create-schema.sql file.
How I eventually loaded the CSV file
The purpose of this mini task was to load data from a CSV file into a MySQL database for analysis.
The Dataset
The data set was your basic Twitter Sentiment Analysis you can find the dataset here if you want to have a bash at this.
In Data Engineering I’ve always found it important to choose the right tool for the right job. So in this instance Fast way to do this as I see it is a direct import into SQL. Load the raw data into MySQL as quickly as possible into a staging table and from there sledge hammer the data to fit your needs.

Once the data was loaded into my staging table a few basic select / inserts did the trick to get the data into the user and tweets tables as needed. You can check the scripts out in the git repo they are nothing special but if you want to take a pick go for it.
Note: I looked at other methods i.e. chunking the file using Python and Pandas but found it to be slow and because I am using a Docker image of MySQL I was getting hindered by security issues with the instance (below error). Workaround was to mess around with the security-file-private setting, but I didn’t look into it any further as loading the CSV file via SQL did the trick.
Error using when using python
The MySQL server is running with the --secure-file-priv option so it cannot execute this statement
When I initially started trying to load this data into the database I went with Python. I was going to import multiprocessing and effectively chuck the file and load it in that way however when I hit the above error I reverted back to just loading the file using SQL to save time. The Python code is in the repo too.
This was a super basic task and the most I got out of it was the Docker part of this it was interesting getting MySQL working in Docker, copying files to the Docker image to use for my database creation and for loading in the CSV file.
Hopefully, some of this will be useful to you.
Tim